Let’s face it: Developers hate meetings. If Scrum meetings are boring, they will hate them, too.
To get their attention and engagement the Scrum meetings need to solve their problems. If done right, Sprint Planning part two is a great way to demonstrate your Development Team the value and power of Scrum, because this part of the meeting is about their work and the problems they will face during the whole Sprint.
Many teams just try to come up with some Jira sub-tasks to satisfy the process of Scrum, but they are not able to create a plan on how to create a Product Increment.
By the end of this article, you are equipped with a facilitation technique you can use to conduct an engaging Sprint Planning 2, where the Development Team creates a visual plan instead of creating random tasks like “develop login” or “testing purchase…”.
The following facilitation technique helps in these situations:
- The team is new to Scrum
- After Sprint Planning the team is not able to describe how they will achieve the Sprint Goal
- Low or no engagement during Sprint Planning
- Remote Sprint Planning
Sprint Planning 2 in a Nutshell

Nothing new here, as this information is straight from the Scrum Guide. However, it may help to show this kind of cheat sheet at the start of Sprint Planning 2 to set the stage for the meeting.
The Workflow of Sprint Planning 2
The following workflow demonstrates how to create an appealing plan to get a Product Backlog item to ‘done’.

1. Silent Brainstorming
Everyone writes down separately the steps required to get the story to ‘done’. A time-box of 10 minutes might be sufficient.
2. Discuss + Merge
The team discusses the steps everybody identified and merge them to get one set of work items. Let one team member start presenting his/her identified steps. The next team member adds steps, if necessary. Remove duplicated items.
3. Split Work Items
If necessary, split work items that take more than one day. Aim for smaller work items to see progress during the Daily Scrum.
4. Dependencies
Identify dependencies and mark items with dependencies (Keep an eye on them during daily scrum)
5. Acceptance Criteria Check
Did you consider all acceptance criteria? If not, go back to step 2.
User Story Task Breakdown Example
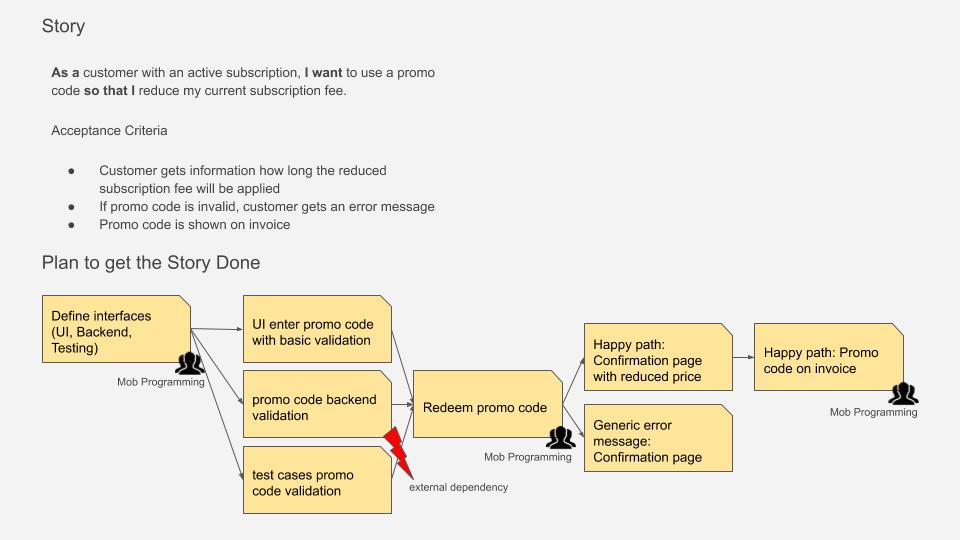
Let’s have a look at a real-life example from a team using the technique above:

This plan is a result of the workflow above. Besides, the team marked work items they want to solve with mob programming.
Using the above workflow helps your team to create a visual plan to get a Product Backlog item done.
Advantages of the Workflow
Applying this workflow leads to a higher level of engagement because each team member has to think about the work elements themselves and present them to the other members.
The visual plan allows your team to identify work that can be done simultaneously by different team members. This will result in a collaborative approach on how to get the Backlog item done as a team.
Team members coming back from holiday will understand the visual plan much easier than a plain Jira task list.
Your team can modify the visual plan as they wish. Some teams might add deadlines, dependencies, or whatever information they need to get the story done.
Ask this Final Question
There is a final question which might help you and your team to identify hidden issues:
What has to happen so that we don’t get the User Story done?
This question will give you a different angle and sometimes you might identify something you didn’t consider.
Equipment
Try to stick with pen and paper/sticky notes. Don’t use Jira or similar text-heavy tools for Sprint Planning 2. If you are conducting the Sprint Planning remote you can use tools like Mural or Miro. Even Google Slides will do the job.

